Building a React Native C++ Turbo Native Module — Part 1

Over the past few weeks, I have been exploring C++ Turbo Native Modules and becoming comfortable with the C++ ecosystem. Enabling developers to write cross-platform C++ code for iOS and Android has significantly improved performance in the React Native landscape. Unfortunately, the documentation for getting started with C++ Turbo Native Modules is incomplete, lacking crucial information on accessing the runtime, registering functions globally in the new architecture, and more.
In this post, we will explore how to create our own C++ Turbo Native Module. Specifically, we will be building a library that enables us to extract metadata from a PNG image using the libpng library in C++.
Throughout this process, we will learn how to create a new React Native library, add an external dependency (libpng in this case), access the JavaScript Interface (JSI), register our functions on the global runtime, and integrate our C++ implementation within our React Native application.
Setup
First, we begin by creating a new libary using react-native-builder-bob:
npx create-react-native-library@latest react-native-image-metadataContinue with the prompts like so until you reach the list:

and choose the Turbo Module option. Then from this:

choose the C++ for Android & iOS option.
Now, we have set up a new Turbo Module that uses C++. If you want to review the trivial example that the scaffolding library provided, check out the cpp folder and how the implementation is used in ios/ImageMetadata.mm .
Now, we can simply run
yarnin the root folder to install all dependencies in the root project and example folder.
iOS
We will begin by setting up the iOS implementation so that it provides the JSI runtime to our C++ code, so that we can register our C++ functions globally.
Replace ImageMetadata.h
We replace the ios/ImageMetadata.h file with the following:
#import <React/RCTBridgeModule.h>

@interface ImageMetadata : NSObject <RCTBridgeModule>

@property(nonatomic, assign) BOOL setBridgeOnMainQueue;

@end
and its neighbouring ImageMetadata.mm file with:
#import "ImageMetadata.h"

#import <React/RCTBridge+Private.h>

#import <React/RCTUtils.h>
#import <ReactCommon/RCTTurboModule.h>
#import <jsi/jsi.h>

#import "../cpp/bindings.h"

@implementation ImageMetadata

RCT_EXPORT_MODULE(IMD)

RCT_EXPORT_BLOCKING_SYNCHRONOUS_METHOD(install) {
  NSLog(@"Installing ImageMetadata module...");

  RCTBridge *bridge = [RCTBridge currentBridge];
  RCTCxxBridge *cxxBridge = (RCTCxxBridge *)bridge;
  if (cxxBridge == nil) {
    return @false;
  }

  using namespace facebook;

  auto jsiRuntime = (jsi::Runtime *)cxxBridge.runtime;
  if (jsiRuntime == nil) {
    return @false;
  }
  auto &runtime = *jsiRuntime;

  imd::install(runtime);

  return @true;
}

@end
There are a few things that are going on in the code above:
- We exported a module
IMD, which will be used in our JavaScript later. - We exported a blocking synchronous function
installwhich will retrieve a reference to the JSI runtime and supply it to our C++ code so that it can install our C++ functions. - We imported a
bindings.hfile, which doesn’t exist yet, that will install all of our C++ functions against the global runtime.
Now, let’s go back to our cpp folder. We should see 2 files: react-native-image-metadata.cpp and react-native-image-metadata.h. Let’s delete both of these and create the following 2 files:
- bindings.h
- bindings.cpp
bindings.h
In this file, we will create a namespace imd and define the install function that will take the JSI runtime:
#include <jsi/jsi.h>
#include <jsi/jsilib.h>

namespace jsi = facebook::jsi;

namespace imd {
void install(jsi::Runtime& rt);
}
bindings.cpp
In this file, we will implement the install function for the imd namespace:
#include "bindings.h"

#include <iostream>
#include <string>

using namespace facebook;

void imd::install(jsi::Runtime& rt) {
  auto getImageMetadata = jsi::Function::createFromHostFunction(rt,
                                                                jsi::PropNameID::forAscii(rt, "getImageMetadata"),
                                                                1,
                                                                [](jsi::Runtime& rt,
                                                                   const jsi::Value& thisVal,
                                                                   const jsi::Value* args,
                                                                   size_t count) -> jsi::Object
                                                                {
                                                                  if (count == 0) {
                                                                    throw jsi::JSError(rt,
                                                                                       "[react-native-image-metadata]["
                                                                                       "getImageMetadata] file path is required");
                                                                  }

                                                                  if (!args[0].isString()) {
                                                                    throw jsi::JSError(rt,
                                                                                       "[react-native-image-metadata][getImageMetadata] "
                                                                                       "file path must be a string");
                                                                  }

                                                                  std::string path = args[0].asString(rt).utf8(rt);

                                                                  jsi::Object result(rt);

                                                                  result.setProperty(rt, "width", 100);
                                                                  result.setProperty(rt, "height", 100);

                                                                  return result;
                                                                });

  jsi::Object md = jsi::Object(rt);

  md.setProperty(rt, "getImageMetadata", std::move(getImageMetadata));

  rt.global().setProperty(rt, "__IMDProxy", std::move(md));
}
A lot is going on here, but the gist of it is that:
- we are creating a JSI function with the name
getImageMetadata - which receives 1 argument (our file path)
- that will execute the lambda function that is supplied as the 4th argument to
createFromHostFunction
Keep in mind that the current iteration of the function only returns the following object:
{
  width: 100,
  height: 100
}
After that, we create an object md and declare it the owner of the function reference, and lastly, register the md object on the global runtime under the name __IMDProxy, and declare __IMDProxy the owner of it. We use move semantics to ensure that the reference is not garbage collected, since it is still owned by the runtime as the application runs.
For more information on move semantics in C++, feel free to reference the std::move documentation.
Modify the root src folder
Let’s quickly clean up the src folder in the root directory.
First, we replace index.tsx with:
export const getImageMetadata = (path: string) => {
  console.log(path);

  return {
    width: 100,
    height: 100,
  };
};
Then, we remove all the code in the NativeImageMetadata.ts file.
Lastly, we slightly modify App.tsx in the example application by removing the reference to the old multiply function:
import * as React from 'react';
import { StyleSheet, View, Text } from 'react-native';
import { getImageMetadata } from 'react-native-image-metadata';

const meta = getImageMetadata('some_img.png');

export default function App() {
  return (
    <View style={styles.container}>
      <Text>Result: {JSON.stringify(meta)}</Text>
    </View>
  );
}

const styles = StyleSheet.create({
  container: {
    flex: 1,
    alignItems: 'center',
    justifyContent: 'center',
  },
  box: {
    width: 60,
    height: 60,
    marginVertical: 20,
  },
});
Pause
Let’s try running our application to see if everything is still working. Before we run it, we need to ensure that our example application is using the podspec we defined in our root folder as a reference:
- Go to
example/ios/Podfilefile - After the `use_react_native` call, add the line below:
use_react_native!(
  ...
)

pod 'react-native-image-metadata', :path => '../..' # <-- Add this line
3. Run the following:
cd example/ios && bundle install && RCT_NEW_ARCH_ENABLED=1 bundle exec pod installAfter this, we can run the application on iOS by opening 2 terminals and running the following in each:
yarn startand
yarn run iosWe should notice that the application is running, so we haven’t broken anything yet on iOS.
JavaScript
Now that we have set up iOS and implemented the C++ module, we need to ensure that JavaScript calls the install function when our application uses the react-native-image-metadata dependency.
We will now write our module initialization in the src/NativeImageMetadata.ts file, which should be empty now.
Add the following code to NativeImageMetadata.ts:
import { NativeModules } from 'react-native';

declare global {
  function nativeCallSyncHook(): unknown;
  var __IMDProxy: object | undefined;
}

if (global.__IMDProxy == null) {
  const IMDModule = NativeModules.IMD;

  if (IMDModule == null) {
    throw new Error(
      'Base react-native-image-metadata module not found. Maybe try rebuilding the app.'
    );
  }

  // Check if we are running on-device (JSI)
  if (global.nativeCallSyncHook == null || IMDModule.install == null) {
    throw new Error(
      'Failed to install react-native-image-metadata: React Native is not running on-device. ImageMetadata can only be used when synchronous method invocations (JSI) are possible. If you are using a remote debugger (e.g. Chrome), switch to an on-device debugger (e.g. Flipper) instead.'
    );
  }

  // Call the synchronous blocking install() function
  const result = IMDModule.install();
  if (result !== true) {
    throw new Error(
      `Failed to install react-native-image-metadata: The native ImageMetadata Module could not be installed! Looks like something went wrong when installing JSI bindings: ${result}`
    );
  }

  // Check again if the constructor now exists. If not, throw an error.
  if (global.__IMDProxy == null) {
    throw new Error(
      'Failed to install react-native-image-metadata, the native initializer function does not exist. Are you trying to use ImageMetadata from different JS Runtimes?'
    );
  }
}

interface IIMD {
  getImageMetadata: (filePath: string) => ImageMetadata;
}

const proxy = global.__IMDProxy;
export const IMD = proxy as IIMD;

export type ImageMetadata = {
  /** The width of the image. */
  width: number;
  /** The height of the image. */
  height: number;
};
The code above initializes the module if it hasn’t done so already, and calls the native install function we created in the ios/ImageMetadata.mm file. After the module is installed, we export the proxy object under the variable IMD.
Now, let’s test out our Turbo Module function by modifying the src/index.ts file’s getImageMetadata function to use the IMD proxy we exported above:
import { IMD } from './NativeImageMetadata';
import type { ImageMetadata } from './NativeImageMetadata';

export const getImageMetadata = (path: string): ImageMetadata => {
  return IMD.getImageMetadata(path);
};

export type { ImageMetadata };
If you run the example application again, you will see that it will still show the following:

Awesome! We have successfully linked our C++ code to JavaScript and used our module to return the result of our C++ lambda function.
Using libpng to extract PNG metadata
Now that everything is linked, we can focus on the C++ code and extend it to use libpng to read the PNG, extract its metadata, and return it to our application.
Install libpng on iOS
First, we begin by adding libpng as a dependency in our podspec file. Since Cocoapods already distributes a version of libpng for iOS, we can add the following line to our react-native-image-metadata.podspec file:
s.dependency "libpng", "~> 1.6.35"Our podspec file should look like this:
require "json"

package = JSON.parse(File.read(File.join(__dir__, "package.json")))
folly_compiler_flags = '-DFOLLY_NO_CONFIG -DFOLLY_MOBILE=1 -DFOLLY_USE_LIBCPP=1 -Wno-comma -Wno-shorten-64-to-32'

Pod::Spec.new do |s|
  s.name         = "react-native-image-metadata"
  s.version      = package["version"]
  s.summary      = package["description"]
  s.homepage     = package["homepage"]
  s.license      = package["license"]
  s.authors      = package["author"]

  s.platforms    = { :ios => "11.0" }
  s.source       = { :git => "https://github.com/e-younan/react-native-image-metadata.git", :tag => "#{s.version}" }

  s.source_files = "ios/**/*.{h,m,mm}", "cpp/**/*.{h,cpp}"

  s.dependency "React-Core"
  s.dependency "libpng", "~> 1.6.35"

  # Don't install the dependencies when we run `pod install` in the old architecture.
  if ENV['RCT_NEW_ARCH_ENABLED'] == '1' then
    s.compiler_flags = folly_compiler_flags + " -DRCT_NEW_ARCH_ENABLED=1"
    s.pod_target_xcconfig    = {
        "HEADER_SEARCH_PATHS" => "\"$(PODS_ROOT)/boost\"",
        "OTHER_CPLUSPLUSFLAGS" => "-DFOLLY_NO_CONFIG -DFOLLY_MOBILE=1 -DFOLLY_USE_LIBCPP=1",
        "CLANG_CXX_LANGUAGE_STANDARD" => "c++17"
    }
    s.dependency "React-Codegen"
    s.dependency "RCT-Folly"
    s.dependency "RCTRequired"
    s.dependency "RCTTypeSafety"
    s.dependency "ReactCommon/turbomodule/core"
  end
end
Then, let’s install the pod dependencies in our example application to ensure that libpng is installed:
cd example/ios && RCT_NEW_ARCH_ENABLED=1 bundle exec pod installAfter running the command above, you should see the following 2 green lines in the terminal:

Great! We have successfully added libpng as a dependency to our module.
C++ Implementation
Let’s begin by creating 2 files in the cpp folder: metadata.h and metadata.cpp.
metadata.h
In the metadata.h file, we add the following:
#include <jsi/jsi.h>

#include <fstream>
#include <string>

namespace jsi = facebook::jsi;

/**
 * A deleter for std::ifstream that closes the file before deleting it.
 */
struct FileStreamDeleter {
  void operator()(std::ifstream* file) const {
    file->close();
    delete file;
  }
};

bool isFilePNG(const std::string& path);

double getFileSize(const std::string& path);

jsi::Object getPNGMetadata(jsi::Runtime& rt, const std::string& path);
We define the following in our header file:
- FileStreamDeleter — A deleter for std::ifstream’s that closes the file before deleting it. This will be used in conjunction with smart pointers in order to ensure that ifstream’s are cleaned up when the function is finished.
- isFilePNG — returns true if the file path hosts a PNG image
- getFileSize — a function that returns the size of the file
- getPNGMetadata — retrieve the PNG’s metadata and return a JSI Object to the caller
metadata.cpp
In the implementation file, we write the extraction logic using libpng:
#include "metadata.h"

#include <jsi/jsi.h>

#include <fstream>
#include <iostream>
#include <string>
#include <vector>

#include "png.h"

namespace jsi = facebook::jsi;

void pngReadCallback(png_structp pngPtr, png_bytep data, png_size_t length) {
  auto input = reinterpret_cast<std::istream*>(png_get_io_ptr(pngPtr));
  input->read(reinterpret_cast<char*>(data), length);
}

bool isFilePNG(const std::string& path) {
  std::unique_ptr<std::ifstream, FileStreamDeleter> fileStream(new std::ifstream(path, std::ios::in | std::ios::binary));
  if (!fileStream || !fileStream->is_open()) {
    return false;
  }

  // Read the first 8 bytes of the file
  std::vector<unsigned char> header(8);
  fileStream->read((char*)header.data(), header.size());

  // All pngs begin with the following 8 bytes: 0x89 0x50 0x4E 0x47 0x0D 0x0A 0x1A 0x0A
  const std::vector<unsigned char> pngMagic = {0x89, 0x50, 0x4E, 0x47, 0x0D, 0x0A, 0x1A, 0x0A};

  // Check if the file matches the PNG magic number
  if (std::equal(header.begin(), header.end(), pngMagic.begin())) {
    return true;
  }

  return false;
}

double getFileSize(const std::string& path) {
  std::unique_ptr<std::ifstream, FileStreamDeleter> inputFile(new std::ifstream(path, std::ios::in | std::ios::binary));
  inputFile->seekg(0, std::ios::end);
  std::streamsize fileSize = inputFile->tellg();
  inputFile->seekg(0, std::ios::beg);

  return static_cast<double>(fileSize);
}

jsi::Object getPNGMetadata(jsi::Runtime& rt, const std::string& path) {
  if (!isFilePNG(path)) {
    throw jsi::JSError(rt, "The file is not a PNG.");
  }

  std::unique_ptr<std::ifstream, FileStreamDeleter> inputFile(new std::ifstream(path, std::ios::in | std::ios::binary));
  if (!inputFile || !inputFile->is_open()) {
    throw jsi::JSError(rt, "Failed to open input file at path: " + path);
  }

  // Initialize PNG structures
  png_structp pngPtr = png_create_read_struct(PNG_LIBPNG_VER_STRING, nullptr, nullptr, nullptr);
  if (!pngPtr) {
    throw jsi::JSError(rt, "Failed to create PNG read struct");
  }

  png_infop infoPtr = png_create_info_struct(pngPtr);
  if (!infoPtr) {
    png_destroy_read_struct(&pngPtr, nullptr, nullptr);
    throw jsi::JSError(rt, "Failed to create PNG info struct");
  }

  // Set error handling
  if (setjmp(png_jmpbuf(pngPtr))) {
    png_destroy_read_struct(&pngPtr, &infoPtr, nullptr);
    throw jsi::JSError(rt, "Error during PNG metadata retrieval");
  }

  // Initialize PNG IO
  png_set_read_fn(pngPtr, static_cast<void*>(inputFile.get()), pngReadCallback);

  // Read PNG info
  png_read_info(pngPtr, infoPtr);

  png_uint_32 width, height;
  int bitDepth, colorType, interlaceMethod, compressionMethod, filterMethod;
  png_get_IHDR(pngPtr, infoPtr, &width, &height, &bitDepth, &colorType, &interlaceMethod, &compressionMethod, &filterMethod);

  // Clean up
  png_destroy_read_struct(&pngPtr, &infoPtr, nullptr);

  // Get file size
  double size = getFileSize(path);

  // Create an object to dump all our metadata into and return to the original caller.
  jsi::Object result(rt);

  result.setProperty(rt, "width", static_cast<int>(width));
  result.setProperty(rt, "height", static_cast<int>(height));
  result.setProperty(rt, "size", size);
  result.setProperty(rt, "bitDepth", bitDepth);
  result.setProperty(rt, "colorType", colorType);
  result.setProperty(rt, "interlaceMethod", interlaceMethod);
  result.setProperty(rt, "compressionMethod", compressionMethod);
  result.setProperty(rt, "filterMethod", filterMethod);

  return result;
}
Since this isn’t a C++ tutorial, I will not dive deep into the implementation. Let’s use our new getImageMetadata function in our bindings that we defined earlier.
In bindings.cpp, we make a modification:
#include "bindings.h"

#include <iostream>
#include <string>

#include "metadata.h" // <--- This is the header file we created in the previous step

using namespace facebook;

void imd::install(jsi::Runtime& rt) {
  auto getImageMetadata = jsi::Function::createFromHostFunction(rt, jsi::PropNameID::forAscii(rt, "getImageMetadata"), 1,
                                                                [](jsi::Runtime& rt, const jsi::Value& thisVal, const jsi::Value* args, size_t count) -> jsi::Object {
                                                                  if (count == 0) {
                                                                    throw jsi::JSError(rt,
                                                                                       "[react-native-image-metadata]["
                                                                                       "getImageMetadata] file path is required");
                                                                  }

                                                                  if (!args[0].isString()) {
                                                                    throw jsi::JSError(rt,
                                                                                       "[react-native-image-metadata][getImageMetadata] "
                                                                                       "file path must be a string");
                                                                  }

                                                                  std::string path = args[0].asString(rt).utf8(rt);

                                                                  return getPNGMetadata(rt, path); // <--- This is the function we created in the previous step
                                                                });

  jsi::Object md = jsi::Object(rt);

  md.setProperty(rt, "getImageMetadata", std::move(getImageMetadata));

  rt.global().setProperty(rt, "__IMDProxy", std::move(md));
}
Now that we have updated our function that is bounded to the JavaScript context, let’s update our TypeScript interface to reflect the changes in our metadata.
In src/NativeImageMetadata.ts, we update the ImageMetadata type with the following updated type:
export type ImageMetadata = {
  /**
   * The width of the image.
   */
  width: number;
  /**
   * The height of the image.
   */
  height: number;
  /**
   * The size of the image in bytes.
   */
  size: number;
  /**
   * The bit depth of the image.
   */
  bitDepth: number;
  /**
   * The color type of the image.
   */
  colorType: number;
  /**
   * The interlace method of the image.
   */
  interlaceMethod: number;
  /**
   * The compression method of the image.
   */
  compressionMethod: number;
  /**
   * The filter method of the image.
   */
  filterMethod: number;
};
And voila, we can use libpng to extract the metadata of a PNG in React Native using C++.
Fixing the Example Application
Now that we have updated the module to extract the information from a PNG, we need to update App.tsx in our example application with a real PNG image to get it to work.
If you try to run the application, you’ll see the following error:
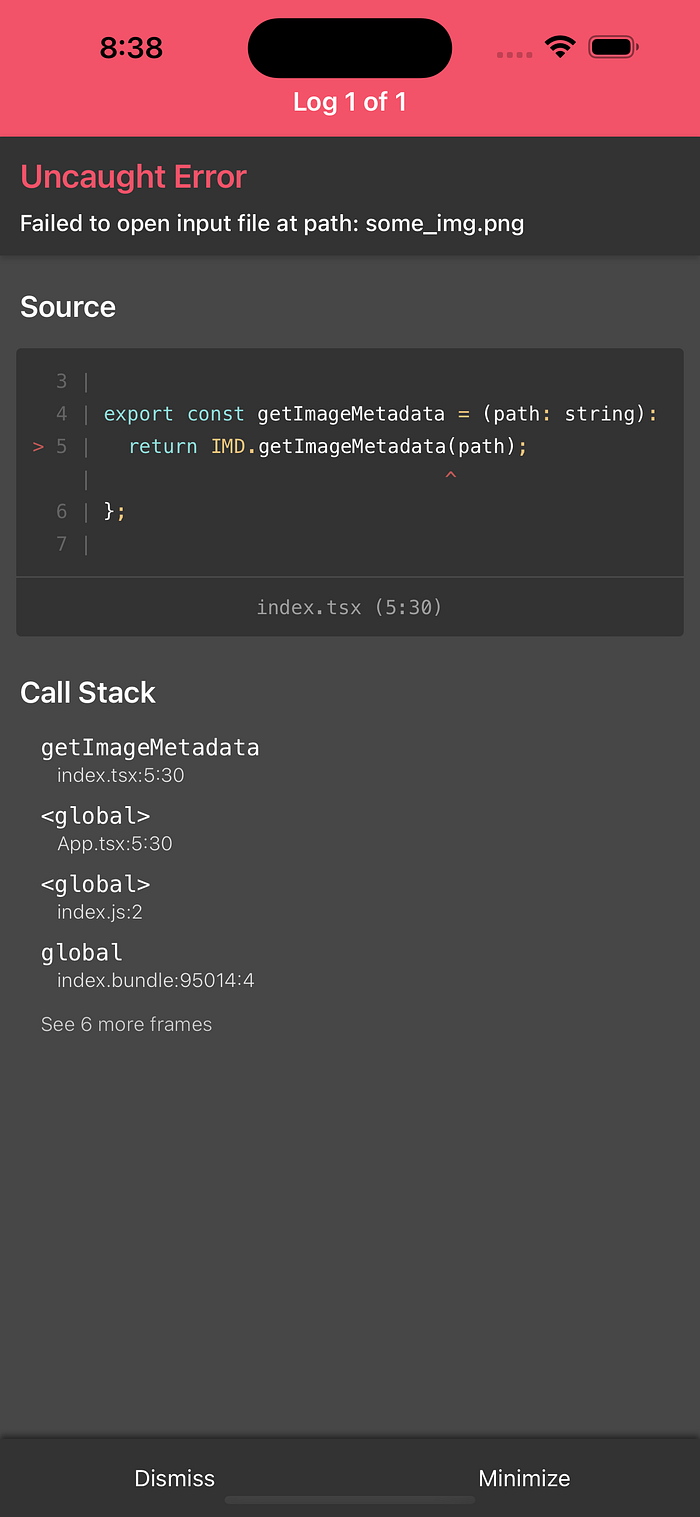
Let’s fix the example so that we can choose a PNG from the camera roll using react-native-image-picker, and get its metadata after.
Set up react-native-image-picker
In order to set up react-native-image-picker, we execute the following commands:
cd example
yarn add react-native-image-picker
cd ios
RCT_NEW_ARCH_ENABLED=1 bundle exec pod install
Once the pod dependencies are installed, we can update App.tsx with the following to test our module:
import React from 'react';
import { StyleSheet, View, Text, Pressable, Platform } from 'react-native';
import { launchImageLibrary } from 'react-native-image-picker';
import { getImageMetadata, ImageMetadata } from 'react-native-image-metadata';
const App = () => {
const [metadata, setMetadata] = React.useState<ImageMetadata | null>(null);
const selectAndGetMetadata = async () => {
const result = await launchImageLibrary({
mediaType: 'photo',
selectionLimit: 1,
});
if (result.didCancel) return;
if (result.errorCode) return;
if (!result.assets || result.assets.length === 0) return;
const asset = result.assets[0];
if (!asset || !asset.uri) return;
console.log('Selected image:');
console.log(asset);
const normalizedUri =
Platform.OS === 'ios' ? asset.uri.replace('file://', '') : asset.uri;
console.log(normalizedUri);
try {
const meta = getImageMetadata(normalizedUri);
setMetadata(meta);
} catch (error) {
setMetadata(null);
if (error instanceof Error) {
console.error(error);
console.error(error.message);
}
}
};
return (
<View style={styles.container}>
<Pressable onPress={selectAndGetMetadata} style={styles.chooseButton}>
<Text>Choose an image</Text>
</Pressable>
{metadata && (
<Text style={styles.metadata}>
Metadata: {JSON.stringify(metadata)}
</Text>
)}
</View>
);
};
export default App;
const styles = StyleSheet.create({
container: {
flex: 1,
backgroundColor: 'white',
alignItems: 'center',
justifyContent: 'center',
},
chooseButton: {
padding: 12,
backgroundColor: 'yellow',
},
metadata: {
marginTop: 12,
paddingHorizontal: 12,
fontSize: 18,
},
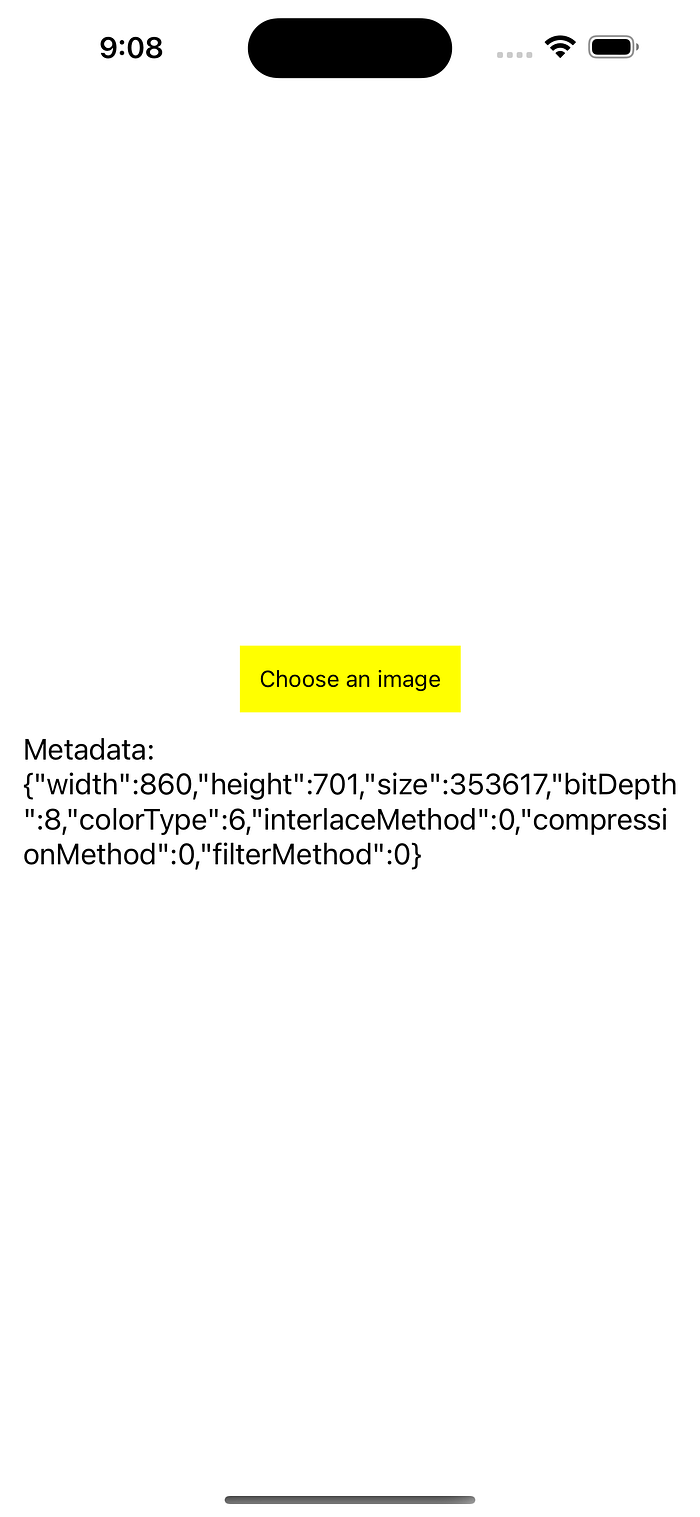
});And voila, once we run the application on iOS, we should see the following output after choosing a PNG in our camera roll:
Download the Code
If you would like to download the code for this medium post, it can be found here.
Conclusion
The ability to use C++ in our React Native applications unlocks the potential for highly performant modules. C++ is particularly advantageous for use cases such as cryptography, compression, file I/O, streaming, and more — all in a cross-platform implementation that both Android and iOS can accommodate.
Stay tuned for Part 2, in which we complete the implementation by setting up Android. We will build libpng for all relevant architectures on Android, link it via CMake, and add the necessary code to the cpp-adapter to ensure everything works seamlessly.
Get in touch
If you or your organization are seeking to develop highly interactive and high-performance cross-platform applications, we invite you to connect with us and explore how our expertise can benefit your project.
Follow me
If you would like to see more content like this, make requests on the type of content you want to see, etc., feel free to:
- Follow my Twitter
- Join my Discord
- Follow me on LinkedIn
In the upcoming weeks, I will be working on creating libraries that take advantage of C++ Turbo Modules to improve the performance of specific use cases that are common in React Native applications. Stay tuned!
Credits
A lot of the implementation and guidance has been extracted from OSP Franco’s JSI Module Tutorial, react-native-mmkv, and react-native-quick-sqlite.
